Wednesday, April 10, 2013

Lime bars

Once again in the practice of hypocrisy, I find myself enjoying yet another “Martha” recipe.  Maybe it’s a trend I should just accept. I told Greg’s mom I would bring dessert for Easter down on Long Island, so I knew I had a challenge as to what to make. I needed something easy, which could sit for a few days, and would travel well. I had pinned these bars a while back, and while frantically going through my pins, I stumbled upon them. Who wants to bring bad dessert to their 
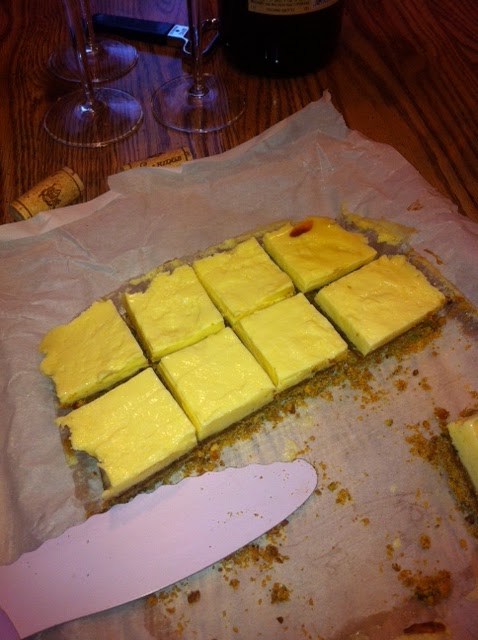
future in laws?!  They are perfect for Easter/Springtime. They are just the prettiest shade of pale green, they are citrusy, and they only require 7 ingredients! Enjoy these bars whenever you want though, because they are delicious.

 Lime bars
Makes 16 bars || Active time: 25 minutes || Total baking time: 1 hour and 15 minutes

Ingredients:
For the crust:
1 cup crushed graham crackers (you can buy them crushed also)
2/3 cup finely ground pistachios
4 Tbsp butter, melted (1/2 stick)
1 tsp chopped lime zest (make sure to zest the lime before juicing it!)
Parchment paper cut to fit an 8x8 pan, with 2” excess hanging

For the filling:
2 egg yolks
1 can sweetened condensed milk (you can use fat free)
½ cup lime juice

Preheat oven to 350. Butter an 8x8 pan and add the cut parchment paper to the pan.  Make sure there is a 2” overhang so you can pull the finished bars out easily.

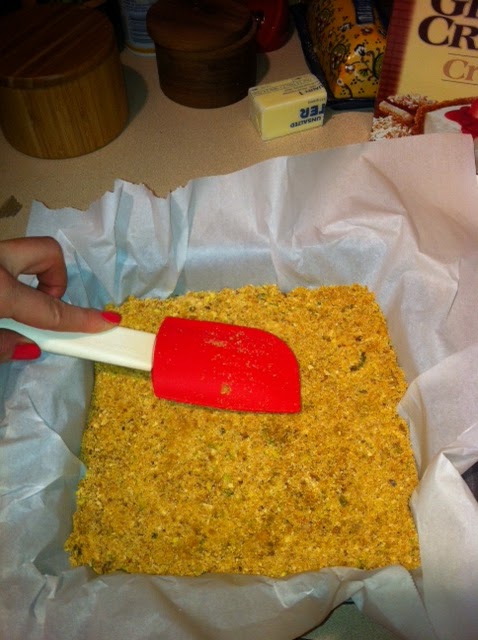
In a bowl combine the crushed graham crackers, pistachios, and lime zest. You can use a food processor to crush the pistachios but if you don’t have one, you can use a gallon size Ziploc bag and a rolling pin. Add the melted butter and stir until the mixture resembles sand. Dump the crust into the pan and pack it gently. Bake for 9-11 minutes. Let cool for at least 20 minutes.


To make the filling, add the egg yolks and sweetened condensed milk. Mix with a whisk until the yolks are fully incorporated. Slowly add the lime juice while whisking continuously. Beat with a whisk for 2 minutes until the mixture thickens slightly. Dump the filling over the crust. Bake for 15 minutes.

Let cool for at least an hour and then chill for a minimum of 3-4 hours. The bars will keep for up to 3 days, uncut. When you are ready to serve them, pull them out of the pan with the parchment paper. Using a serrated knife, cut the bars into 16 pieces. To get a smooth cut, wipe the blade clean in between each cut.

Tuesday, April 2, 2013

Lobster ravioli with blush sauce

Lobster Ravioli
Serves 2 || Active time: 20 minutes 

This recipe is life changing. Okay..maybe not life changing, but at the very least it is so delicious and takes under 10 ingredients. I used fresh lobster ravioli from Trader Joe's (which is super delicious and only 3.69 a pack) but you can use any lobster ravioli you want.

Ingredients:
  • 1 package lobster ravioli
  • 2 Tbsp olive oil
  • 1 shallot, diced fine
  • 2 cloves garlic, minced
  • 1 cup tomato sauce
  • 1/2 cup jarred alfredo sauce
  • handful of Parmesan cheese
Directions:
Saute the shallot with olive oil on medium heat until translucent. Add garlic, and saute for 1 minute. Add the tomato sauce and reduce the heat to medium low. Once you add the ravioli to boil, add the alfredo sauce to the tomato sauce and stir occasionally until heated through. Serve immediately with ravioli.


Wednesday, March 13, 2013

Asian salmon patties with sriracha mayo


As a very healthy option, salmon is on our menu once a week. It is rich in omega-3 fatty acids, vitamin D, vitamin A, vitamin B, iron, calcium, selenium.. you get the idea. I am always looking for different ways of preparing it, as not to get tired of the “classics”. Normally, I am not a giant fan of a recipe that calls for a little bit of many ingredients, however, I think of this recipe as an investment. Buying sriracha sauce is going to cost you around $2.00 and you will find there are many uses for it. Ginger root can seem unnecessary for 1 inch, but trust me, it is crucial in this recipe. The good news is ginger is excellent frozen and will last for months. Plus, these ingredients are all in the same type of cuisine, so any other Asian recipes will most likely require these same ingredients. These patties can be made a day in advance and refrigerated until cooked.

Asian Salmon Patties
Serves 2-3 || Cooking time: 1 hour || Active cooking time: 25 minutes
 
Ingredients
  • 1 1/2 pounds skinless salmon fillet, finely chopped
  • 1 shallot, minced finely
  • 2 tablespoons grated peeled fresh ginger (1 inch of ginger root)
  • 1 large egg, lightly beaten
  • ¼-1/2 cup panko bread crumbs
  • 1/4 teaspoon crushed red pepper
  • Coarse salt and ground pepper
  • 2 Tbsp olive oil
  • 1 tsp butter
  • Lime wedges, for serving (optional)
  • 1/2 cup reduced-fat mayonnaise
  • 1-2 Tbsp sriracha sauce
  • 2 thinly sliced scallions
  • 2 tablespoons fresh lime juice
  • 1 teaspoon toasted sesame oil

Directions:
To make sriracha mayonnaise: In a small bowl, stir together mayonnaise, sriracha, scallions, lime juice, sesame oil, salt and pepper. Chill until ready to serve.

Unless you want to dirty two cutting boards, start by chopping your vegetables first. Finely mince the shallot and ginger; add to a large bowl. Make sure there is no skin or bones left on the salmon. With a very sharp knife, chop the salmon into small pieces; add to the bowl. Add the egg, crushed red pepper, salt, pepper, and ¼ cup of the panko.  Gently combine the mixture with your hands; if the mixture seems too moist, add more panko until it just comes together. 

Form mixture into eight 1-inch-thick patties, packing each firmly; transfer to a cookie sheet on wax paper. Cover with plastic wrap. Chill for at least 30 minutes, or up to a day.

Heat a large skillet over medium-high heat. Add two Tbsp olive oil and 1 tsp butter to the pan. Add salmon patties; cook until browned on both sides and just opaque throughout, 4 to 6 minutes per side, turning carefully. 


Thursday, February 28, 2013

Dutch Oven Three Berry Cobbler


As an adult, I am exercising my right to make dessert two nights in a row…well…because..I can! Cobblers are one of my favorite desserts, but I usually save them for special occasions because they can be time consuming. I took bits and pieces of different cobbler recipes and added my own twists and voila! Delicious berry cobbler! The secret to the success of this dessert is the dough. Usually, traditional cobbler dough is made, chilled, rolled out, and then baked. I cheated and used Bisquick so the dough takes 3 minutes to make. Honest to God it tastes just as good. I still love my homemade dough cobblers, but on weeknights when I have a craving, I will turn to this recipe. I always have berries on hand because I put them in smoothies, but you can definitely use frozen fruit as well. If you do though, just add 2 tablespoons of cornstarch, instead of 1, in order to ensure the sauce is thick enough.

 Dutch Oven Three Berry Cobbler:
Serves 4-6 || Total cooking time: 1 hr and 45 minutes || Active time: 20 minutes

Ingredients for filling:
·      1 pint fresh blueberries
·      1 pint fresh raspberries
·      1 ½ cups fresh strawberries, sliced (about half a container of strawberries)
·      1 cup sugar
·      1 Tbsp cornstarch
·      2 Tbsp lemon juice (half a lemon)
·      zest from half a lemon
Ingredients for topping:
·      2 ½ cups baking mix, such as Bisquick
·      ¼ cup + 1 Tbsp sugar
·      tsp baking powder
·      ⅛ tsp salt
·      ¼ cup (1/2 a stick) butter, melted
·      ¾ cup milk
·      cinnamon for dusting, optional


In a bowl, toss the fruit with the sugar, cornstarch, lemon juice and zest. Let the filling sit for 30-45 minutes at room temperature to allow the berries to macerate.

Preheat the oven to 350°.

In a large bowl, combine the baking mix, sugar, baking powder, salt, butter and milk.

Using a dutch oven, generously grease with butter or nonstick spray. Add the berry mixture to the dutch oven. Take large dollops of dough and evenly drop it around the cobbler in a circle and one dough ball in the middle (you should have 7). Brush half and half (I only had skim milk, so that’s what I used) over the dough and sprinkle with cinnamon.

Bake for 35-45 minutes or until bubbling and browned. Start checking the dough after 30 minutes and remove it from the oven as soon as the dough is cooked through and browned. For my oven, exactly 40 minutes did the trick. Let sit for about 10 minutes and serve warm with vanilla ice cream. Enjoy!


Wednesday, February 27, 2013

Roasted Potatoes and Fennel

I love potatoes and I love fennel so why not put them together? I've seen recipes similar to this so I took ideas from each and out popped a delicious side dish. I personally believe that vegetables taste best roasted and are so incredibly easy to cook. You let the oven do the work and I PROMISE you can turn vegetables haters into vegetable lovers! I think fingerling potatoes are best for this dish, but if you can't find them just make sure to use small red or yellow potatoes instead.

Roasted Potatoes and Fennel
Serves 4 || Active cooking time: 10 minutes || Total cooking time: 45 minutes

Ingredients:
  • 1 lb fingerling potatoes, halved
  • 1 bulb of fennel, sliced
  • 1 medium onion, sliced
  • 2 cloves of garlic, coarsely chopped
  • 3 Tbsp olive oil
  • 1 Tbsp salt
  • 1 tsp pepper
Directions:

Preheat oven to 425°.

Halve the fingerling potatoes and set aside in a large bowl. To slice the fennel, first cut the bulb down the middle. Cut off the leaves and leave about an inch of the green stem of the fennel. Take each half, and slice the fennel, about 1/4", lengthwise. Add to the potatoes. Slice the onions and combine the vegetables in the bowl with the 3 Tbsp olive oil, salt and pepper.

Spray a baking pan with nonstick spray and add the vegetables. Evenly sprinkle the vegetables with the garlic.

Bake 35-40 minutes, stirring halfway through, until the potatoes are tender and the vegetables are browned and carmelized.


Friday, February 22, 2013

Craisin and Walnut Granola


With the combination of working at a hospital and an intense cold and flu season in full peak, it was inevitable sickness would come. And come it did, everything went on hold for a full few weeks! I have been a bad amateur blogger, but here is a delicious recipe that will have you munching for breakfast, lunch, and snacks! 
It probably is not the healthiest granola out there, but the reason I love it is because there are NO preservatives! There's nothing in here but yummy natural ingredients. Plus, as long as it is in an air tight container, it will keep for a month! Another perk is that, unlike pricey granolas, the whole batch probably costs around $2.50

Raisin Craisin and Walnut Granola
Makes approximately 6 cups || cooking time: 1 hour 5 minutes

2 cups old fashioned oats
1 cup shredded coconut
1 cup wheat germ
1 1/2 cup chopped walnuts

1 teaspoon salt
1 14 oz. can sweetened condensed milk
1/4 cup olive oil
1/2 - 1 cup craisins

**Optional: 1/4 cup flax seeds or chia seeds (for more fiber)**


Preheat oven to 300°. 

 
Prepare a large jelly roll pan, broiler pan or large cookie sheet by covering with parchment paper that is sprayed lightly with Pam. If for some reason you forget parchment paper that week at the store (like me), you can always go without, but make sure you really spray the heck out of the pan!

Combine oats, coconut, wheat germ, nuts and salt in large bowl. Stir in condensed milk and oil and mix thoroughly. 


Spread granola mix in pan on top of parchment paper. The key here is surface area. Make sure every inch of the pan is covered in order to get the granola to be the spread.

Bake at 300 degrees for 1 hour - stirring every 10-12 minutes (This is a VERY important step; otherwise your granola will be burned in some areas and raw in others!)
Remove from the oven and stir in the craisins. Let cool and store in a tightly sealed container. Will keep about a 1 month.


Thursday, January 24, 2013

Turkey Meatloaf


Meatloaf is not the most glamorous of meals, but it’s so good who cares? I like to make turkey meatloaf, as I think it is a bit healthier than red meat, and because I honestly think it tastes better. This is Ina Garten’s turkey meatloaf. I love her and her recipes, but her biggest downfall is that she forgets normal people don’t spend $30.00+ per meal. Her recipe calls for 5 pounds of ground turkey. If you do the math, that’s about $25.00 in just the turkey. I experimented and tweaked her measurements and came up with an equally delicious meatloaf that uses 3 pounds. I know you may be thinking, 3 pounds is still a lot, but trust me, you may end up cursing me wishing for the full 5 pounds. I always wait until ground turkey is on sale at the grocery store (which it often is) and stock up, which makes this meatloaf much more affordable.

Ingredients:
·      ½ red bell pepper, chopped
·      1 large onion, chopped
·      2 Tbsp olive oil
·      ½ tsp salt
·      ½ tsp pepper
·      ½ tsp dried thyme, or 1 tsp fresh thyme
·      2 ½-3 tsp Worcestershire sauce
·      ½ cup chicken stock
·      1 tsp ketchup
·      2 large eggs, beaten
·      1 cup Italian dried bread crumbs
·      1 tsp salt
·      ½ tsp pepper
·      3 pounds ground turkey (if using frozen, make sure it is completely defrosted)
·      ½ cup ketchup

If you’re going to bake the meatloaf immediately, preheat oven to 325°. On the bottom shelf, add a 9x13” pan of water to ensure even cooking time for the meatloaf.

Preheat a sauce pan over medium low heat. Add olive oil, onions, pepper, thyme, salt and pepper. Saute over medium low heat until onions and peppers are tender and just starting to brown, about 15 minutes.

 Meanwhile, in a medium bowl, combine the Worcestershire sauce, chicken stock, and ketchup. Stir in the onion mixture and set aside to cool to room temperature. 


In a large bowl, add the ground turkey. Add the cooled onion mixture, breadcrumbs, eggs, salt and pepper. Using your hands, gently stir the mixture until just combined. Do not over mix! 


On a large greased cookie sheet, dump the meatloaf mix out and gently shape into an oval, about 4 inches high. Spread ketchup evenly over the meatloaf.


At this point, you can either bake it or refrigerate it and bake it off later. If you’re going to bake the meatloaf later in the day, do not add the ketchup yet. Just cover tightly with plastic wrap and add the ketchup just before you bake it.


If you’re baking it immediately, place the meatloaf on the shelf above the water bath. Bake, covered loosely with foil, for 1 hour. Remove the foil and bake another 25-30 minutes uncovered. Let rest for 3-5 minutes before slicing. Enjoy with mashed potatoes.