Monday, December 24, 2012

Christmas goodies

I love Christmas for so many reasons. Among the top are that I can eat as many sweets as I can because, well, it's the holidays! This year was my first year without the woes of school and finals, so I found myself with a lot more free time. I searched about 30 recipes that looked absolutely delicious but in the end, decided with 5. Here are my top picks for EASY, delicious recipes that are sure to bring a smile. The best part is that many can be made ahead of time, frozen, or kept out so you don't need to frantically bake for 48 hours straight!

1. Melted Snowman Cookies 
These are on the blog, but can be found pretty much anywhere! This was my pick for a "fun" cookie and they were so much fun to make! Greg even helped out and had his hand at decorating these melted men.


2. Nonpareils Candies
Greg's mom emailed me this link for homemade sweets from Martha Stewart. Normally, I am not a giant Martha fan, but after taking a look I decided I had to make something. These are SO incredibly easy to make. The hardest part is waiting for them to dry!  They are sure to impress. I caved and bought the Martha Stewart treat bags to go with them and made them that much cuter. These will stay for weeks once cooled!


3. White Chocolate Oatmeal Craisin Cookies
This link will deceive you at first. I found this recipe for oatmeal cookies, even though technically the link takes you to "oatmeal cookie sandwiches". This is in my opinion the most perfect recipe for oatmeal cookies. They stay soft and chewy for days and the addition of the white chocolate chips and craisins has an amazing effect. They are my favorite Christmas cookie. Just follow the recipe for the cookie and stir in a 1/2 cup of white chocolate chips and 1/2 cup of craisins at the end.


4. Peanut Butter Blossoms
A classic cookie around the holidays. I made one batch of these and they turned out so yummy I made a second batch the next day! Very easy to make, and every ingredient can easily be found in the pantry. I may run and eat one right now.


5. Mini Cranberry Walnut Bread
I first tried these when my mom made them for Christmas. I ate almost the entire loaf in one sitting. They are so easy to prepare and to make them even more special I bought mini ceramic loaf pans from The Christmas Tree Shoppe for only $1! This bread freezes very well, so it makes a nice gift for any delayed holiday events.


Anyone have any traditions they have around the holidays? Enjoy the season!

Wednesday, December 12, 2012

Melted Snowman Cookies


When it comes to Christmas cookies, I am a traditionalist. It is never Christmas without my mom’s sugar cookies. I wanted to make a creative “updated” Christmas cookie without changing my roots, so when I found these melted snowman cookies, I knew I had a winner. You can by all means buy packaged sugar cookie dough, but honestly, this recipe is SO simple, you’re better off just making them from scratch! The best part of my mom’s recipe is that unlike many cookies, these do not fall prey to the hard, crumbly cookie death. Instead, they stay incredibly soft and delicious for days after you bake them.

I have to admit that while the cookie dough is best homemade, I cheated and bought store bought icing. I happen to believe that it is almost just as cheap and so much easier to buy icing. If you want to truly make it all from scratch, here is a great icing recipe I found.

Give yourself a few days for these cookies, the cookies must be cooled completely and the marshmallows must be dry enough to frost them. I made the cookie dough Thursday morning, baked the cookies on Thursday afternoon, added the marshmallows that night and iced the cookies Friday. Once they are complete, they will stay perfectly moist for up to 5 days in an air tight container.

Melted Snowmen Cookies
Makes 16 cookies

Ingredients:
·      1 batch sugar cookie dough (recipe to follow)
·      1 jar of vanilla icing
·      1 package of large marshmallows
·      Nonstick spray
·      1 tube black decorating icing
·      1 tube orange decorating icing
·      1 tube blue/red/green decorating icing
·      Sprinkles for buttons, optional

Sugar Cookie Dough:
·      ¾ cup a 50/50 mixture of butter and vegetable flavored Crisco (it’s easiest if you use the Crisco sticks), at room temperature
·      1 cup sugar
·      2 eggs, room temperature
·      1 tsp vanilla
·      2 ½ cup flour, plus more for rolling
·      1 tsp baking powder
·      1/8 tsp salt

Cream butter/Crisco mixture with sugar for 2 minutes. Add the eggs, one at a time until incorporated. Mix in vanilla. In a medium bowl combine flour, baking powder, and salt. Working in thirds, mix the dry ingredients until just combined.

Dump the dough onto wax paper and form a disc. Cover with saran wrap and chill for a minimum of one hour. (I chill mine for at least 3 hours! Overnight wouldn’t hurt either so you can make it ahead of time)

Preheat oven to 400°. Cut the dough in half, returning the second half to the fridge. Turn the dough out on a floured surface and roll to ¼” thickness. Use a circle cookie cutter (or in my case, a cup) to cut out 3-4 inch circles. Bake on ungreased cookie sheet for 6-7 minutes or until JUST golden brown. Remove cookies to a rack to cool.


 Once the cookies are cool, you can start assembling the snowmen cookies. Ice the cookies with the vanilla icing, making sure to cover the cookies. Then, working in batches, start heating the marshmallows to place on the cookies. I had sixteen cookies so I microwaved four at a time.  First, spray a plate with nonstick spray, add the four marshmallows and microwave for 12-15 seconds. **The key here is to just heat the marshmallows through. Do NOT let the marshmallows expand, they will not fit on the cookie. Spray your fingers with nonstick spray then take the marshmallows out and immediately place them on the cookie close to one end of the circle. Gently press down to make sure the marshmallow stays. I liked to change up how “smushed” I made the heads of the snowmen. Repeat this until all the cookies have a marshmallow.

Once the cookies are ready to be iced, assemble all the tubes and have fun! Let your creativity fly here; I tried the arms in different positions, scarves, and different smiles. 

Store the cookies in a single layer air tight container.
 

Tuesday, December 11, 2012

Roasted tomato and shrimp pasta


Roasted tomatoes and shrimp pasta
Serves 4 || total time: 1 hour || active time: 25 minutes

I wanted to challenge myself to make a dish without using a recipe. I started with the roasted tomatoes and went from there. I got the inspiration from a restaurant at Disney World, Narcoossees, from which came one of the best meals of my life so far. I was served these tomatoes on a seemingly simple salad, but one bite convinced me otherwise. They were absolutely delicious and I knew I had to make them myself. I love tomatoes and shrimp together and picked the rest of the ingredients from my kitchen pantry.

I always have these ingredients in the fridge, freezer, or pantry and the actual cooking time was quick. If you don’t have shrimp, try chicken. This recipe is great anytime of the year, regardless of tomato season since the roasting brings out an intense tomato flavor.


Ingredients:
·      ½ lb shrimp, peeled and deveined
·      1 carton grape or cherry tomatoes
·      3 cloves garlic, peeled left whole
·      1 shallot, sliced
·      ¼ cup scallions, sliced ½”
·      zest and juice of one lemon
·      5-7 marinated artichoke hearts (I like Wegmans brand)
·      ¾-1 lb penne pasta
·      ½ cup pasta water (don’t throw away your water after cooking the pasta!)
·      ¼ cup white wine (or chicken stock)
·      ¼ cup white wine
·      parmesan cheese for sprinkling

Directions:
Preheat oven to 375°. On a small sheet pan, drizzle olive oil and add tomatoes and garlic. Toss with salt and pepper to coat. Roast for 25-30 minutes or until the tomatoes just burst. Set aside to cool.


While the tomatoes are roasting, peel and devein the shrimp. To devein, run a paring knife along the back of the shrimp and pull the insides out. (If you’ve never done this, don’t be grossed out, you’re just removing some not so yummy insides)

Put a pot of water on to boil. Add penne then start the sauce. In a large sauté pan, sauté shallots on medium heat until just translucent. Add scallions, lemon zest and artichoke hearts.  Sauté for 2 minutes. Add shrimp and sauté until shrimp are almost cooked. (you don’t want to overcook the shrimp) Add wine and lemon juice and let the sauce simmer. Add the cooked penne and roasted tomatoes and garlic to the sauté pan and thoroughly coat the pasta. Take about ½ cup of pasta water and add to the dish. Let cook for another minute or two then, off the heat, sprinkle with parmesan cheese.


Sunday, November 18, 2012

Bulgogi


Bulgogi

Thankfully I am adopted and have escaped my culture’s cuisine, because I am not a very big fan of Korean food. Bulgogi is the exception to this rule. It is absolutely delicious, and unlike a lot of Korean dishes, not spicy, steamed, or fermented. The dish gets better the longer it marinates, and tastes best when given a full day to sit.

Bulgogi
Total time: 1 day || Active time: 20-25 minutes || serves 4

·      1 ½-2 lb lean, top round steak (London broil)
·      medium, hard pear, peeled
·      4-5 garlic cloves, peeled left whole
·      2-3 inch cube fresh ginger, peeled and chopped in large chunks
·      ½ cup soy sauce
·      4-5 scallions, trimmed
·      3 carrots, sliced very thin, about 1/8”
·      8-9 medium mushrooms, such as cremini, sliced into thin strips
·      1 medium onion, sliced into thin strips
·      2 Tbsp sesame oil
·      2 ½ Tbsp sugar
·      white or brown rice, for serving

The day before:
Make the marinade. Peel the pear and then cut down each side leaving just the core. Cut each side into 3 pieces. In a blender, add the soy sauce, sesame oil, pear, garlic, and ginger. Pulse until the sauce thickens.

Use a plastic cutting board for this and you will only have to dirty one! Peel and thinly cut the carrots into coins. *Disclaimer: I did not cut the carrots correct in the picture. Further investigation from my mom who makes this dish way more than me lead to me cutting up each carrot way thinner.* Wipe the mushrooms off with a damp cloth and then remove the stem and cut into 5-6 slices. Peel and slice the onion vertically in order to get thin strips. Trim the ends of the scallions, and cut into 2/3” strips.

Wipe off your cutting board and lay the meat out. Trim off any excess fat on the sides. Then, with a sharp knife, thinly slice the beef. Meat cuts best when being cut in two directions, so as you press down, move the knife back. The steak should yield you about 20 or so pieces. From there, you can leave the steak (as I did) or if you want, you can then cut each piece into two smaller pieces, depending on how you like to eat it.


Using a gallon size Ziploc bag, take the steak and the vegetables and put them in the bag. Carefully pour the marinade in the bag.  Add sugar, and gently work into the marinade. It may look like there is not enough marinade, there is! This is why it’s crucial to marinade it overnight; the longer it marinades the better it tastes. Refrigerate for a minimum of 4 hours, but a day is prime.

The next day:
Take the marinade out of the fridge; set aside. (the marinade will get darker, and will make more sauce..the benefits of marinating longer!)


In a cast iron skillet, or large non-stick skillet (a wok works best, but I don’t cook enough stir fry to have a wok) heat over medium high heat until pan is screaming hot. (I used a cast iron skillet and it took about 10 minutes to achieve this state) Working in batches, cook the meat and vegetables until the meat is just cooked and the vegetables are just tender. (this is why slicing very thin is necessary!) Put the cooked bulgogi in a large serving dish and cover tightly with foil, adding each time until all the bulgogi is cooked. There should be leftover marinade in the bag at the end of this. Pour it in the skillet and let is boil for 5 minutes, stirring constantly. Pour over the meat and vegetables and serve with rice.


Who knew Korean cooking was so easy?


Wednesday, November 14, 2012

Blondies


Blondies
Makes 16 bars

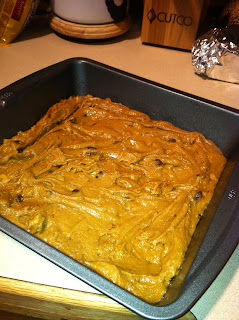
These brownies are the essence of “pantry cooking”. At only 10 ingredients, these blondies can be made in less than 35 minutes start to finish. The best news is if you don’t have the right nuts or the right chips; that’s okay, just change it up and add what you have! I happened to have walnuts but did not have white chocolate chips, so I used semi-sweet chocolate chips, and they were equally delicious, if not better.

Ingredients:
  • 1 cup flour
  • ½ tsp baking powder
  • 1/8 tsp baking soda
  • 1/8 tsp salt
  • 1 cup packed brown sugar
  • 1/3 cup butter, melted
  • 1 egg
  • 1 Tbsp vanilla
  • 1/3 cup chopped walnuts
  • ½ cup white chocolate chips/semi-sweet chocolate chips/milk chocolate chips

Directions:
Preheat oven to 350°. Combine the dry ingredients in a medium sized bowl. Melt butter in the microwave. Use the power setting at 40% (otherwise you’ll have a giant buttery mess), heating every 15 seconds until almost melted. Add it to a bowl and add the brown sugar. Mix well on medium speed. Add the egg and vanilla and mix in. Mix in 1/3 of the dry ingredients until barely mixed in. Repeat until the dry ingredients are gone; do not over mix! Stir in the chocolate chips and walnuts. Pour the batter into a 9-inch greased pan. Bake 20-25 minutes.


Wednesday, October 31, 2012

Girl Scout Cookie Samoas Bars


Samoas Bars
Serving size: 24

I needed an easy to eat, delicious dessert for a party I was having recently. (Turns out, against all odds, I really am turning into my mom.) I found these on another blog and decided to give them a shot! I usually try out a recipe before serving it for others, but was short on time. Luckily these bars are so easy and forgiving, they turned out exactly how they should have. I did change around the steps and added a few things here and there, just to make it easier. Give yourself a few hours for these, they are not hard to bake, but just take time. Side note, this is a terrific recipe if you cook with someone else, or kids. There are a lot of steps that could be accomplished at once, with the help of others!

·      ½ cup sugar
·      ¾ cup butter, softened (1 ½ sticks of butter)
·      1 large egg (or extra large, use whatever you have)
·      1 tsp vanilla extract
·      2 cups flour, plus extra for dusting
·      ¼ tsp salt
·      3 cups shredded coconut (1 12oz bag is plenty)
·      14 oz chewy caramels (1 14oz Kraft© original caramals bag)
·      20oz chocolate chips (semi-sweet, milk or a mixture of both, about a bag and a half)
·      3 Tbsp milk

Preheat the oven to 300°. On a baking sheet, lay out the coconut. You don’t need to grease the pan, there is enough oil in the coconut to keep it from sticking. Toast in the oven for 10-15 minutes, stirring every 5 minutes. The coconut should be just toasted and have a dry feel to it. Don’t over toast it! Set aside to cool.


Turn the oven up to 350°. In a large bowl, cream butter and sugar for about 2 minutes. Beat in the egg and vanilla extract. Mix in the flour and salt 1/3 at a time, until just combined. Don’t over mix, or the dough will be tough. The mixture will be slightly crumbly and coarse; this is a good thing! Dump the mixture into a 9x13 inch baking pan (no need to grease). Press the dough into the corners, making sure the dough is even throughout the pan. This is where you will need the extra flour, the dough is very sticky! Use the flour to help maneuver the dough into the pan. Bake for 20-25 minutes, or until just golden brown on the edges. Set aside to cool completely.

Don’t make the coconut and caramel topping too early, you want to be able to dump it right on top of the cooled crust. I waited about ½ an hour for the crust to cool to begin the caramel topping. Melt the caramels in a microwave safe bowl. First, spray the bowl with nonstick spray. Then unwrap the caramels and put them in the bowl with the milk. Microwave for 2-4 minutes, stirring every 30 seconds. If there are still a few caramels almost melted, that’s fine. Just keep stirring and they will melt from the residual heat.
 Mix in the toasted coconut, then evenly spread on the cookie base. This is much easier if you spray a nonstick spatula. (**I tried to spread the mixture using my hands, but just ended up with a big mess, use the spatula to your advantage**) Allow to cool completely.
Cut the bars into desired shape. I got 24 bars out of mine, but you can cut them to whatever size you wish. You can either melt the chocolate chips in the microwave, stirring every 30 seconds, or you can use a double boiler and let the chocolate melt. If using a double boiler, set a glass bowl over simmering water in a pot. DO NOT let the bowl touch the water, or the chocolate will burn. Keep the water on low, so it is just simmering. Add about 4 Tbsp half & half to the chocolate mixture if using a double boiler. If the chocolate looks too thick, or isn’t melting properly, keep adding half and half, a Tbsp at a time, until it becomes the consistency you want. (This happened to me, I had the water way too hot.) Carefully, dip the bottom of each bar into the chocolate  and place on a cookie sheet lined with wax paper. Do not be stingy here, the more chocolate the better!

Working quickly, take the excess chocolate and add it to a Ziploc bag. I experimented, and found that the easiest way to do this is a coffee mug and a half gallon Ziploc bag. Put the bag inside the coffee mug, and roll the top of the bag around it. Add the chocolate to the bag, then pull the bag out and close the top. Voila, no mess! Cut the tip of the bag in the bottom corner, and carefully pipe lines of chocolate however you wish onto the bars.

Refrigerate the bars on the wax paper for at least 3 hours. Then find a container and keep them refrigerated, they should last for a few weeks, but I doubt you’ll ever keep them that long.

Saturday, October 6, 2012

Breakfast Tart

I was having someday-to-be in-laws over for breakfast and wanted to make something really easy that was different. I came across a breakfast tart recipe in my food network magazine, and decided to, as usual, change some of the ingredients. The original tart can be a bit pricey with some of the ingredients, so I swapped them out for much cheaper ones. I chose bacon instead of pancetta, cream cheese instead of mascarpone cheese, and swiss cheese instead of gruyere. Those changes saved me about $7+ and the tart was, in my mind, just as delicious!

Breakfast Tart
Serves 4-6
  • 1 9 inch tart pan (if you do not own a tart pan, use a pie pan, just watch the cooking times)
  • 1 9 inch unroll-and-bake pie crust (not one already in a shell)
  • 1 large egg white, beaten
  • 2 tsp vegetable oil
  • 3-4 ounces bacon cut into 1/4 inch slices (the recipe calls for pancetta, so by all means use it. but a pound of bacon is the same price as 3 ounces of pancetta)
  •  5 large eggs, room temperature
  • 1/2 cup (4oz) cream cheese, softened (or mascarpone)
  • 2 cups swiss cheese (or gruyere)
  • 1/2 onion, chopped
  • 1/4 cup asparagus, broccoli, zucchini, pepper (whatever you have on hand)
  • 1/2 tsp salt
  • 1/2 tsp pepper
1. Preheat the oven to 425 degrees. Unroll the pie crust gently over the tart shell and using your fingertips, gently press the crust up the sides of the shell. If there is some uneven spots, that is okay.
2. With the tines of a fork, prick the bottom of the pie crust. Brush the beaten egg white (save whatever is left!) over the crust, and bake for about 10 minutes, or just until the crust looks set. Set aside to cool.


3. Meanwhile, in a nonstick skillet, cook bacon until crispy, stirring the pan frequently. Drain the bacon, reserving the bacon grease, on a plate lined with a paper towel and set aside.

4. Remove all but 1 Tbsp of the bacon grease, and add the onions and whatever vegetable you choose. Add a pinch of salt and pepper. Cook over medium heat, just until the onion is soft. Drain the vegetable mixture as well, and set aside.

5. In a medium bowl, whisk the eggs together, adding in the beaten egg white from before. No use wasting half an egg white. Add the cream cheese, swiss cheese, salt and pepper. Once combined, gently add the bacon and vegetables. Pour the mixture into the cooled crust and bake for 18-20 minutes or just until the top is a nice golden color.


6. At this point, either cool the tart and serve warm or room temperature, or dig in and enjoy!


Tuesday, July 3, 2012

Peach Raspberry Cobbler


As with most recipes, I ended up combining techniques from Ina Garten’s Peach and Blueberry crumbles and the Deen Brother’s Peach Cobbler. This recipe is great for summer, and the good news is you don’t have to wait for peaches to be in season since they cook anyway. I experimented and made the cobbler ahead of time and then baked it off hours later. The cobbler was delicious and is really good for a make ahead dessert. If you don’t like raspberries you can substitute a pint of blueberries.

**A big thanks goes to some of my favorite relatives Mim and Bill for an awesome graduation gift! The casserole dish was perfect for this dessert and I couldn't have made it without the dish. Thanks!!**

Raspberry Peach Cobbler

For the filling:
·      6 small/medium size peaches
·      1 pint raspberries
·      ½ cup sugar
·      ¼ cup Jello© instant tapioca pudding mix
·      1 tsp cinnamon
·      juice of ½ lemon
·      1/8 tsp salt

For the cobbler:
·      1 2/3 cup flour
·      3 ½ Tbsp sugar
·      1 ½ Tbsp baking powder
·      1/8 tsp salt
·      6 Tbsp cold, unsalted butter, cut into small cubes
·      2/3 heavy cream

Butter a 1 ½ or 2 ½ quart baking dish; set aside. Prepare a large bowl with cold water and ice cubes; set aside. In a large pot of boiling water, add peaches whole. Boil for 60 seconds then quickly remove the peaches and add to the cold ice water. One at a time, peel each peach, remove the core, and slice into ¼ inch slices. (**If the peaches are under ripe, this process takes a bit more time, but I found boiling the peaches for 2 minutes makes it easier.) In a large bowl, add the peaches, sugar, tapioca, salt, cinnamon, and lemon juice. Stir, then gently fold in the raspberries. Add the filling to the buttered dish.

In another large bowl, add the flour, sugar, baking powder, and salt. Stir gently. Add the cold small cubes of butter and with clean hands, mix the butter into the flour until the butter is mixed in and it has the texture of sand. (*You can also use a food processor for this.) Slowly add the heavy cream, stirring each time until the mixture just barely comes together. It will appear too dry, but if you take a chunk of dough and squeeze it gently in your hand and it comes together, it is perfect.  Dump the dough onto a floured surface, and gently form it into a disc. Shape the dough into 2 inch balls, and gently flatten so the balls more oval shaped. Add each on top of the fruit filling. Any extra dough that is left can be sprinkled over the entire dish. 


At this point you can either bake it at 350° for 45-60minutes uncovered or refrigerate and bake off later. Serve warm with vanilla ice cream.